Monday, August 29, 2016

Join a group in Outlook on the web

When you join a group, you gain access to the group mailbox, calendar, OneNote notebook, and OneDrive for Business site. Permissions are taken care of automatically so you don't need to worry about missing any of the meetings or conversations.

Join a group

  1. Open Outlook on the web.
  2. In the navigation pane, under Groups, select Discover. (If you don't see Discover, click More at the bottom of your groups list. Once all of your groups are displayed you should see the Discover link.)
    Discover button on the navigation pane in Outlook on the web
  3. All available groups will be listed in alphabetical order. Select the one you want and click Join. If the group is public, you'll see a confirmation message and become a member right away. If the group is private, type a reason why you want to join > Send.
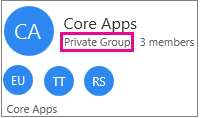
    TIPS: How do you know at a glance whether a group is private? Sometimes it's noted at the top of the group card, as in this example.
    Sample group card with "private group" highlighted
    Once you've joined a group you'll receive a welcome message that contains important information and links to help you get started. If the group is public, you'll get the message right away. If the group is private, you'll get the welcome message after you've been approved by group owner.

Join a group in Outlook 2016


When you join a group, you gain access to the group mailbox, calendar, OneNote notebook, and OneDrive for Business site. Permissions are taken care of automatically so you don't need to worry about missing any of the meetings or conversations.
Applies to This article applies to groups in Outlook 2016. If you're using groups in Office 365, see Join a group in Outlook on the web.

Search for a group to join

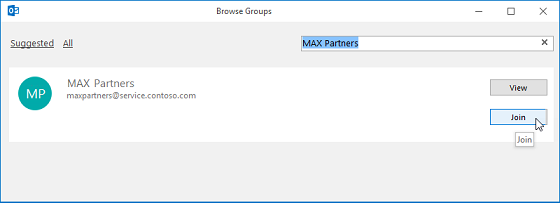
  1. On the Home tab, enter the group name in the Search People box.
  2. When you find the group that you're looking for, select it from the list.
    Search for a group
  3. On the group's contact card, click Join.
    Join a group from a contact card
    If the group is private, a request will be sent to the group's admin, who can accept or decline the request.

Join a group from an email

You might receive an email message from a group that you're not a member of and decide to join the group.
  1. Select Join on the group header in the right corner of the reading pane.
    If the group is private, you'll see Request to Join instead, and will be asked to provide a reason for joining.
    Request to join a group from an email
  2. Wait for your request to go through, or for the group's admin to add you if you're trying to join a private group.
  3. Once you've joined the group, you'll see detailed membership status as well as a shortcut to navigate to the group's inbox.

Go to a group that you were added to as a member

When you're added to a group, you receive an email notification.
  1. Open the email and click Go to the group link.
    Join a group in Outlook
  2. Use the options on the ribbon to start a conversation, change your membership status, and so on.
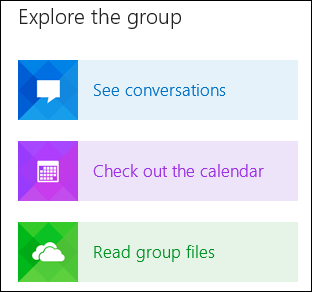
  3. You can also go to the Explore the group section in your email notification to view the conversations as well as the group's calendar and files.
    Explore a group in Outlook
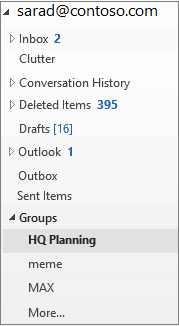
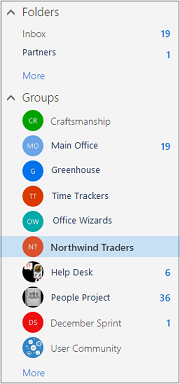
    All the groups that you've created or were invited to are on the left nav bar under Groups. You can access any of them by just clicking the group name. Then, you can participate in the conversations or use the options on the ribbon to access the files, calendar, notebook, and other information.
    Select a group on the left Nav
NOTE: If you click the link in the invitation from Outlook 2013, you'll be redirected to Outlook on the web to view the group's information and start communicating. You can view the group's email in your Outlook inbox and reply.

Add and remove group members in Outlook 2016

As projects come and go, so too will your group members. Undoubtedly, you'll need to add and remove members over the life of the group; you might even need to add or remove group owners.
Any member of a public group can add others to the group, but only the group owner can remove them. By default, the group owner is the person who created the group but others can be assigned this role as well.
Applies to This article applies groups in Outlook 2016. If you're using groups in Outlook on the web, see Add a member to an existing group in Office 365.
  1. On the ribbon in Outlook 2016, type the group name in the Search People box, and then select the group.
    Search for a group
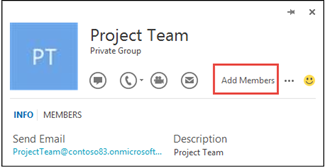
  2. Select Add Members.
    Add Members
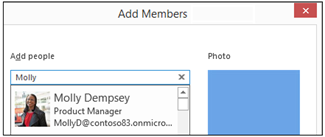
  3. In the Add People box, search for people within your organization either by their full name or email address, and then select the names to add.
    Add new members
    TIP: If you want to add multiple people at the same time, add the names or email addresses, separated by a semicolon.
  4. Click OK.

Remove a member from a group

  1. Under Groups in the left nav, select your group.
    Select a group on the left Nav
  2. On the ribbon, select Edit Group.
    Edit a group in Outlook 2016
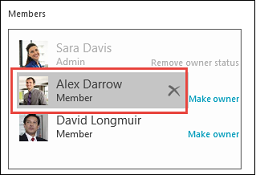
  3. In the Edit group box, point to the name of a member you want to remove, and click the X.
    Remove a member
    WARNING: When using a touch screen, if you tap the name of a group member, the entry is deleted and no prompt for confirmation is displayed.


Add and remove group members in Office 365

As projects come and go, so too will your group members. Undoubtedly, you'll need to add and remove members over the life of the group; you might even need to add or remove group owners.
Any member of a public group can add others to the group, but only the group owner can remove them. By default, the group owner is the person who created the group but others can be assigned this role as well.

Add Members to a Group
  1. Open Outlook on the web.
  2. In the navigation pane, under Groups, select your group.
    Left nav from Outlook in Office 365
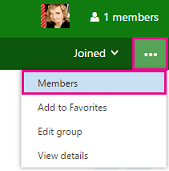
  3. In the group header, select The More Actions icon > Members.
    To add a member, click More Actions > Members
  4. Choose the Add members button.
    Add member button
  5. Enter the name of a person in your organization who you want to add. The member must have a user mailbox within your Office 365 tenant. As you type, suggestions will be displayed. Select the appropriate person. To add multiple members, start typing the next name after each selection.
    Add a group
  6. Choose Save.


Remove a Member from a Group
You must be a group owner to remove members. 
  1. Under the group header, click All to see all of the group members.
    Groups header with All button highlighted
  2. Hover over the name of the member you want to remove, and then click The More Actions icon > Remove from group.

View Group Owners
Under the group header, select Owners to see all of the group owners.
Groups header with Owners link highlighted


Promote a Member to Owner
You have to be a group owner to promote one of your group members.
  1. Under the group header, select All.
    Groups header with All button highlighted
  2. Hover over the name of the member you want to promote and choose The More Actions icon >Make owner.

Demote an Owner to Member
When demoting an owner to member status, keep in mind that the group must have at least one owner. Only group owners can demote.
  1. Under the group header, select Owners.
    Groups header with Owners link highlighted
  2. Hover over the name of the member you want to promote and select The More Actions icon > Remove owner status.

Create a Group in Outlook


Groups is a feature of Office 365 that provides a shared workspace for collaboration and sharing. The workspace comes with a shared inbox, calendar, library, OneNote notebook, and planning tool.
An Office 365 group is different from a contact group (formerly called a distribution list). A contact group is a set of email addresses. You can use the contact group to send an email message or meeting invitation to all the addresses at once. To create a contact group, see Create a contact group.
Office 365 Groups must be enabled before you can use any of the collaboration tools. If you don't see the ribbon or buttons described below, the feature might not be enabled for you. Talk to your IT department for assistance.


Create a group in Outlook on the web(formerly Outlook Web App)


  1. Open Outlook on the web.
    TIP: You can also create a group fromOneDrive for Business. The steps are exactly the same.
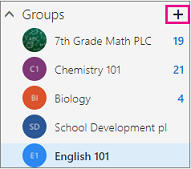
  2. In the navigation pane, next to Groups, select the + button. (If you don't see the + button, hover your mouse over the navigation pane.)
    Left navigation pane in Outlook on the web with Create button highlighted
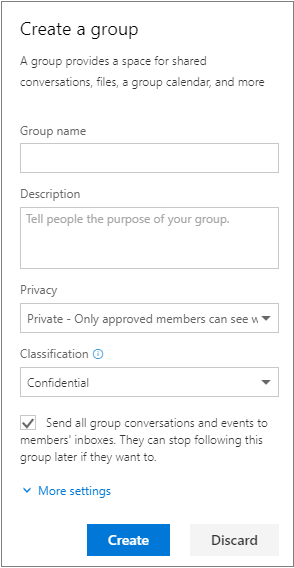
  3. In Choose a name, enter a group name that briefly captures the spirit of the group.
  4. A suggested group ID is provided. To assign a different name to your group which will be part of the group URL, click EditEdit next to the Group ID box.
    If you see "not available," the group ID is already in use. Try something different. Note that once you choose a group ID, it cannot be changed.
  5. In Add a description, enter a detailed description of the group to help others understand its purpose. This description will be included in the welcome email when others join the group.
  6. In Privacy, do one of the following:
    • To create a group in which anyone within your organization can view its content and become a member, select Public.
    • To create a group in which membership requires approval by a group owner and only members can view group content, select Private.
  7. To enable subscribed members to receive email and calendar event notifications in both their group inbox and personal inbox, select Subscribe members so they receive group conversations and calendar events in their inbox. This is recommended when members belong to multiple groups because it means they can see all group notifications in one place without having to visit each group mailbox in order to stay current with group activity.
  8. Select Create.
    Create group pane with all information filled out
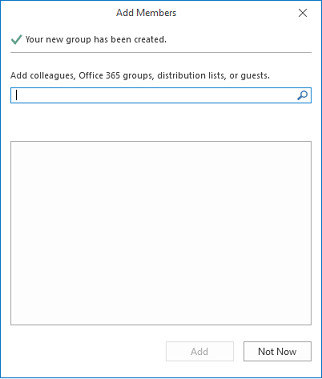
  9. If you're ready to add members to your newly created group (you aren't able to add external users at this time), continue with the create group wizard. Otherwise, select Not now. You can always come back and add group members later.

Create a Group in Outlook 2016

  1. Open Outlook 2016.
  2. On the Home tab, choose New Group.
    Groups options on the main Outlook ribbon
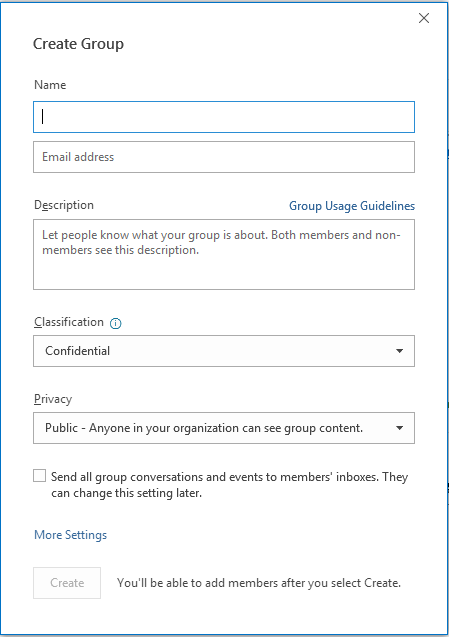
  3. In the Create Group window, enter the required information, including NameGroup ID, and Privacy level, (Public or Private). You won't be able to change the group ID after you create the group.
  4. Check the subscription box to let members receive the group's emails in their regular inbox or keep it un-checked if you prefer that they access the group's mail only from the group's inbox, and then click OK.
    Create a group
  5. Add the members (you aren't able to add external users at this time), description, and a photo for the group, and then clickOK. You can add members after the group is created as well.
    Create a new group
  6. Click OK. You'll see your newly created group in the left nav and a Welcome email in your group's inbox.


Introduction to Outlook Data Files (.pst and .ost)

When you use Outlook 2013 or Outlook 2016, your email messages, calendar, tasks, and other items are saved on a mail server, on your computer, or both. Outlook items that are saved on your computer, are kept in Outlook Data Files (.pst and .ost).

Outlook Data File (.pst)

An Outlook Data File (.pst) contains your messages and other Outlook items and is saved on your computer. The most common type of email account — a POP3 account — uses Outlook Data Files (.pst). Your email messages for a POP3 account are downloaded from your mail server and then saved on your computer.
Outlook Data Files (.pst) can also be used for archiving items from any email account type.
Because these files are saved on your computer, they aren’t subject to mailbox size limits on a mail server. By moving items to an Outlook Data File (.pst) on your computer, you can free up storage space in the mailbox on your mail server.
When messages or other Outlook items are saved in an Outlook Data File (.pst), the items are available only on the computer where the file is saved.

Offline Outlook Data File (.ost)

Most account types other than POP3 use an offline Outlook Data File (.ost). These accounts include Microsoft Exchange Server, Outlook.com, Google Gmail, and IMAP accounts. When you use these accounts, your email messages, calendar, and other items are delivered to and saved on the server. A synchronized copy of messages are downloaded and saved on your computer in an offline Outlook Data File (.ost).
When your connection to the mail server is interrupted, you still can read and compose messages. When a connection is restored, changes are automatically synchronized, and the folders and items on the server and on your computer are identical again.

File locations

The fastest way to open the folder where your Outlook Data File (.pst and .ost) is saved is to do the following:
  1. In Outlook, click the File tab.
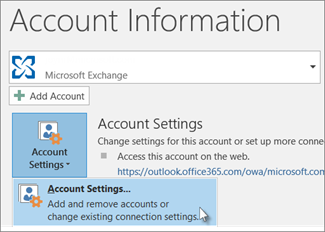
  2. In right pane, click Account Settings, and then click Account Settings.
    Account Settings
  3. On the Data Files tab, click an entry, and then click Open Folder Location.
Outlook Data Files (.pst) created by using Outlook 2013 or Outlook 2016 are saved on your computer in theDocuments\Outlook Files folder. If you upgraded to Outlook on a computer that already had data files that were created in Microsoft Office Outlook 2007 or earlier, these files are saved in a different location in a hidden folder at drive:\Users\user\AppData\Local\Microsoft\Outlook.
The offline Outlook Data File (.ost) is also saved at drive:\Users\user\AppData\Local\Microsoft\Outlook. Most data remains on the server; however, any items that are saved locally should be backed up. For example, Calendar, Contacts, Tasks, and any folders marked Local only.
TIP:  For information about hidden folders in Windows, see Windows Help and Support.

Locating the Outlook data files

There may be times when you need to find your Outlook .pst file — for example, when you have a new computer and need to transfer your messages, calendars, contacts, tasks, or notes, or when your computer has crashed and you've lost some of your Outlook data. Here’s a list of places where Outlook 2013 and Outlook 2016 save backed-up information on your computer.

Backed-up emails, calendars, contacts, tasks, and notes (.pst)

An Outlook Data File (.pst) contains your backed-up email messages, calendars, contacts, tasks, and notes, and can be stored in one of the following default locations:
  • drive:\Users\<username>\AppData\Local\Microsoft\Outlook
  • drive:\Users\<username>\Roaming\Local\Microsoft\Outlook
  • drive:\Users\<username>\Documents\Outlook Files
  • drive:\Users\<username>\My Documents\Outlook Files
  • drive:\Documents and Settings\<username>\Local Settings\Application Data\Microsoft\Outlook
TIP: Can't find a subfolder (such as AppData) mentioned below? It might be hidden by Windows. Learn how to unhide folders and file name extensions.

Offline or cached Outlook items (.ost)

Email accounts, such as Microsoft Exchange, Outlook.com, or IMAP keep your mail on a server. The Offline Outlook Data File (.ost) is a synchronized copy of the account saved on your computer, and is stored in one of the following default locations, based on the client version and the Outlook account type:
  • drive:\Users\<username>\AppData\Local\Microsoft\Outlook
  • drive:\Documents and Settings\<username>\Local Settings\Application Data\Microsoft\Outlook
NOTE:  All the data in the .ost file is kept on the server, so you don’t have to back it up. Your account server synchronizes the .ost file on your computer to keep your Outlook items current.

Personal Address Book (.pab)

Personal Address Book (.pab) files are lists of names and distribution lists, used in Outlook 2003 and earlier versions. To use them in Outlook 2013 or Outlook 2016 for Windows, convert the files from one of the following default locations into a contacts folder by clicking File > Open & Export > Import or Import/Export.
  • drive:\Users\<username>\AppData\Local\Microsoft\Outlook
  • drive:\Documents and Settings


Offline Address Book (.oab)

The Offline Address Book (.oab) is used by Microsoft Exchange Server accounts. It contains information, such as names, e-mail address, titles, and office locations, from the Global Address List (GAL) on an organization’s Exchange server.
You don't have to back up or restore this file as it is created and updated automatically by the server. It's stored in the following default locations, based on the client version and the Outlook account type:
  • drive:\Users\<username>\AppData\Local\Microsoft\Outlook
  • drive:\Documents and Settings\user\Local Settings\Application Data\Microsoft\Outlook

Other Outlook Data

This section shows file locations by file type:

Navigation Pane settings (.xml)

  • drive:\Users\<username>\AppData\Roaming\Outlook\profile name.xml
  • drive:\Documents and Settings\user\Application Data\Microsoft\Outlook\profile name.xml

Registered Microsoft Exchange extensions (.dat)

  • drive:\Users\<username>\AppData\Local\Microsoft\Outlook
  • drive:\Documents and Settings\user\Local Settings\Application Data\Microsoft\Outlook

Print styles (Outlprnt with no extension)

  • drive:\Users\<username>\AppData\Roaming\Microsoft\Outlook
  • drive:\Documents and Settings\user\Application Data\Microsoft\Outlook

Signatures (.rtf, .txt, .htm)

  • drive:\Users\<username>\AppData\Roaming\Microsoft\Signatures
  • drive:\Documents and Settings\user\Application Data\Microsoft\Signatures

Stationery (.htm)

  • drive:\Program Files\Common Files\Microsoft Shared\Stationery
  • drive:\Program Files (x86)\Common Files\ Microsoft Shared\Stationery
  • drive:\Program Files\Common Files\Microsoft Shared\Stationery

Custom forms

  • drive:\Users\<username>\AppData\Local\Microsoft\Forms
  • drive:\Documents and Settings\user\Local Settings\Application Data\Microsoft\Forms

Dictionary (.dic)

  • drive:\Users\<username>\AppData\Roaming\Microsoft\UProof
  • drive:\Documents and Settings\user\Application Data\Microsoft\UProof

Templates (.oft)

  • drive:\Users\<username>\AppData\Roaming\Microsoft\Templates
  • drive:\Documents and Settings\user\Application Data\Microsoft\Templates

Send/Receive settings (.srs)

  • drive:\Users\<username>\AppData\Roaming\Microsoft\Outlook
  • drive:\Documents and Settings\user\Application Data\Microsoft\Outlook

Message (.msg, .htm, .rtf)

  • drive:\Users\<username>\Documents
  • drive:\Documents and Settings\user\My Documents


How to unhide folders and file name extensions

Some of the folders might be hidden folders, and Windows might have file name extensions (such as .pst, .ost, .pab) turned off. To show hidden folders and file name extensions, do the following:
  1. Open Control Panel.
    • In Windows 10, right-click the Start button, and then click Control Panel.
    • In Windows 8, press the Windows key + X, then click Control Panel.
    • In Windows 7, click Start > Control Panel.
  2. In the View by list, make sure either Large icons or Small icons is selected so that you can see all the icons in Control Panel.
  3. Click Folder Options.
  4. Click the View tab.
  5. In the Advanced settings box:
    1. Under Files and Folders, uncheck the Hide extensions for known file types box
    2. Under Hidden files and folders, click the Show hidden files, folders, and drives button.
    3. Click OK.