NOTE: If you use a Microsoft Exchange Server account in Outlook 2013 or Outlook 2016 for Windows, use the Automatic Replies feature. See Automatically reply to email messages with an Exchange Server account (formerly Out of Office Assistant). This article is for all other email account types, such as Outlook.com (formerly Hotmail), POP3, and IMAP.
You can set up Outlook 2013 to send an automatic response to some or all of the people who send you an email message.
You can combine an Outlook email template with Outlook rules to simulate the functionality of the Automatic Replies feature that is available only to Exchange Server accounts.
First, create a message template.
- Click Home > New Email.

- In the message body, type the message that you want to send as your automated reply.
- In the message window, click File > Save As.
- In the Save As dialog box, in the Save as type list, click Outlook Template.
- In the File name box, type a name for your message template, and then click Save.
Now, create a rule to automatically reply to new email messages.
- Click Home > Rules > Manage Rules & Alerts.
- In the Rules and Alerts dialog box, click New Rule.
- Under Start from a blank rule, click Apply rules on messages I receive, and then click Next.
- Under Which condition(s) do you want to check?, check any criteria that you want, and then click Next. Typically, you don’t need to check any items.
- Under What do you want to do with the message?, check reply using a specific template.
- Under Step 2: Edit the rule description (click an underlined value), click a specific template.
- In the Select a Reply Template dialog box, in the Look In box, click User Templates in File System.
- Select the template that you created in the previous section or one that you have created or downloaded, and then clickOpen.
- Click Next.
- Check any exceptions to the auto-reply rule. It’s common not to add any exceptions.
- Click Next.
- Under Step 1: Specify a name for this rule, type a name for the auto-reply rule, and then click Finish.
IMPORTANT: For the Rules Wizard to send a reply automatically, Outlook must be running and configured to check periodically for new messages.
The reply using a specific template rule in the Rules Wizard sends your automated reply only one time to each sender during a single session. A session is every time you start Outlook until you exit the application. This rule prevents Outlook from sending repetitive replies to a single sender from whom you receive multiple messages. During a session, Outlook tracks who has received a response. If you exit and then restart Outlook, that’s considered a new session. The list of the senders who received automated replies is reset.
TIP: Consider creating an Outlook task or to-do reminder to help you remember to turn off this rule when you want to stop sending automatic replies.
Turn off automatic replies
To turn off a rule that is sending automatic replies, do the following:
- Click Home > Rules > Manage Rules & Alerts.
- On the Email Rules tab, under Rule, uncheck the rule that you want to turn off.
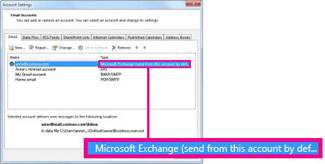
How can I tell if I have an Exchange account?
- Click File > Account Settings > Account Settings.

On the Email tab, the list of accounts indicates the type of each account.

No comments:
Post a Comment