Showing posts with label outlook. Show all posts

Wednesday, August 24, 2016

Change your Calendar work days and the start of your week

You can choose the days of the week that are a part of your work week, the time when your work day starts and ends, and the day of the week that you want to be the start of your week.
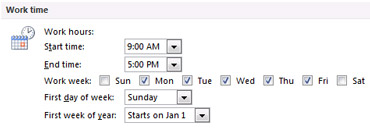
By default, the work week is defined as Monday through Friday with a work day of 9 A.M. to 5 P.M. The first day of the week is Sunday.
To change your work days and times, do the following:
  1. Click the File tab.
  2. Click Options.
  3. Click Calendar.
  4. Under Work time, do one or more of the following:
    Work time section in Outlook Options dialog box
    • To change your work hours     In the Start time and End time lists, click the start time and end time of your work day. This is primarily used for your free/busy time availability for meeting requests from other people.
    • To set your work week     Select the check boxes for the days that are a part of your work week. Clear the check boxes for the days that are not a part of the work week.
    • To set the first day of the week     In the First day of week list, click a day.
    • To set the first week of the year     In the First week of year list, click an entry.

How to move Outlook meetings without losing the option to "Send Update"

Symptoms
Consider the following scenario. You use Microsoft Office Outlook 2003, Microsoft Office Outlook 2007, or Microsoft Outlook 2010 to import or copy meetings to your mailbox. When you open a meeting, you notice that the Send Update button is missing. Additionally, newer versions of Outlook add the prefix "Copy:" to the meeting subject, and the Info Bar shows the following message:
This meeting was copied to your calendar and will not receive updates. To receive updates, contact the organizer, organizer_name.
In this message, organizer_name represents the name of the meeting organizer.

Note If you originally created the meeting that was imported, your name appears here. In that case, this seems to be counterintuitive because you are viewing the meeting in your own calendar.
Cause
When meetings are exported to or imported from an Outlook Personal Folder or Outlook Data (.pst) file, the GlobalObjectID (GOID) property of the meeting is not included. When you copy and paste meetings from one calendar to another, Outlook generates new GlobalObjectIDvalues for the meetings that are newly created.

The GlobalObjectID is a unique identifier for a meeting. All meeting invitations, responses, and updates that are associated with any single meeting contain the same GlobalObjectID. Outlook does not create meetings that have duplicate GlobalObjectID properties. To do this, Outlook excludes the property during import and export and generates a new GlobalObjectID value when a meeting is copied. This prevents anyone who imported or copied your meetings from assuming the organizer role and sending updates for meetings that you own.
Resolution
To maintain full meeting functionality as the meeting organizer, move meetings from one calendar folder to another. To move a meeting or series of meetings, use the cut-and-paste method. Because the original meeting is deleted, as soon as the paste process is complete, the meeting no longer exists in the original location. Because the meeting that is pasted to the new location is unique, the GlobalObjectID value is maintained.

To move all the Calendar items to another folder, you must first display all the items in a tabular view. To display the items in the folder in a tabular view, use one of the following methods:
  • Temporarily clear the filter from an existing tabular view.
  • Define a new and permanent tabular view of all calendar items.

For Outlook 2010

How to clear the filter from an existing tabular view

To do this, follow these steps:
  1. Click to select the calendar folder that contains the meetings that you want to move.
  2. On the View tab, click Change view, and then click to select one of the tabular views such as By List or By Category.
  3. On the View menu, click Reset View.
  4. Click Yes to reset the view to the original settings.

How to define a new and permanent tabular view

To do this, follow these steps:
  1. Click to select the calendar folder that contains the meetings that you want to move.
  2. On the View tab, click Change view, click Manage Views, and then click New.
  3. Type a name for the new view, click to select Table, and then click OK.
  4. In Advanced View Settings, click Sort.
  5. In the Sort items by list, click to select Start and Ascending.
  6. In the Then By list, click to select (none), and then click OK.
  7. Click OK, and then click Apply View.
Both of these procedures will display a list of all calendar items. 

After all items are displayed, follow these steps:
  1. To select all items, use the keyboard shortcut, Ctrl+A. 
    Note If you only want to copy specific meetings, hold the Ctrl key, and then click to select individual meetings.
  2. To copy and then delete the items, use the keyboard shortcut, Ctrl+X.
  3. Click to select the destination calendar folder.
  4. To paste the items, use the keyboard shortcut, Ctrl+V.

This process moves the selected calendar items into the destination folder.

For Outlook 2007 and for Outlook 2003

How to clear the filter from an existing tabular view

To do this, follow these steps:
  1. Click to select the Outlook calendar folder that contains the meetings you want to move.
  2. On the View menu, point to Current View, and then click to select one of the tabular views such as Events or By Category.
  3. On the View menu, point to Current View, and then click Customize Current View.
  4. In the View Summary dialog box, click Filter, click Clear All, click OK, and then click OK again.

How to define a new and permanent tabular view

To do this, follow these steps:
  1. Click to select the calendar folder that contains the meetings that you want to move.
  2. On the View menu, point to Current View, click Define Views, and then click New.
  3. Type a name for the new view, click to select Table, and then click OK.
  4. In View Summary, click Sort.
  5. In the Sort items by list, click to select Start, and then click Ascending.
  6. In the Then By list, click to select (none), and then click OK.
  7. Click OK, and then click Apply View.
Both of these procedures will display a list of all calendar items. 

After all items are displayed, follow these steps:
  1. On the Edit menu, click Select All.
  2. On the Edit menu, click Cut.
  3. Click to select the destination folder.
  4. On the Edit menu, click Paste.
This process moves the selected calendar items into the destination folder.
More information
You can also drag the meetings by holding down the right mouse button. When you drop the meetings in the desired target calendar, select the Move option from the shortcut menu.

For more information about the GlobalObjectID property, visit the following Microsoft MSDN website:
Properties
Article ID: 2167170 - Last Review: 07/22/2014 19:48:00 - Revision: 10.0

Microsoft Office Outlook 2003, Microsoft Office Outlook 2007, Microsoft Outlook 2010, Microsoft Exchange Online

  • vkbportal107 o365 o365022013 KB2167170

Cancel a meeting


Remove a meeting from your Outlook calendar when the meeting isn’t necessary and you want to let the meeting attendees know the meeting is cancelled.
  1. On the navigation bar, click Calendar.
  2. Click the meeting, but don’t open it.
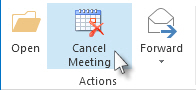
  3. Click Cancel Meeting.
Cancel Meeting command on the ribbon
  1. Type a message to let the attendees know the meeting is cancelled. It’s not necessary, but it helps to avoid confusion.
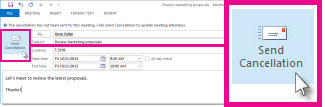
  2. Click Send Cancellation.
Send Cancellation button in a meeting window
The meeting, including any meeting agenda, notes, and attachments, is deleted from Outlook.
Only the meeting organizer—the person who sends a meeting request—can send a meeting update or a cancellation.
If you want to cancel one or all meetings that are part of a recurring series, see one of the following:

Cancel all future meetings in a series

The best way to cancel remaining meetings in a series is to send a meeting update with a new end date. This prevents the deletion of any meeting agenda, notes, and attachments you or the attendees saved in past meetings on your calendar.
IMPORTANT:  Any exceptions associated with the recurring meeting will be lost. To learn more about exceptions, see “Working with recurring meetings” in Best practices when using the Outlook Calendar.
  1. On the navigation bar, click Calendar.
  2. Double-click any meeting in the series.
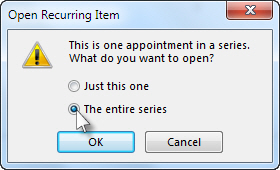
  3. Click The entire series, and then click OK.
    Select the entire meeting series option
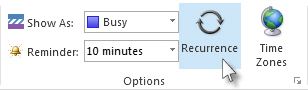
  4. Click Recurrence.
    Recurrence command on the ribbon
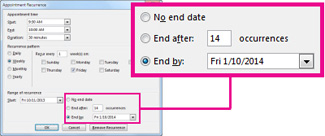
  5. Under Range of recurrence, click End by, and then enter a date prior to the next meeting in the series.
    Change recurring meeting end date option
  6. Type a message to let the attendees know the future meetings are cancelled.
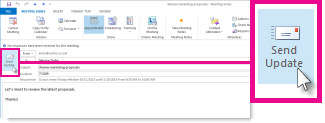
  7. Click Send Update.
    Send Update command for a meeting series
Only the meeting organizer—the person who sends a meeting request—can send a meeting update or a cancellation.

Best practices when using the Outlook Calendar


The Outlook Calendar fully integrates with email, contacts, and other features. This integration makes the Calendar component one of the most popular features of Outlook. In this article, we will guide you through the use of the Calendars various functions. In addition, we’ll introduce you to calendar improvements that are specifically targeted to make your experience more consistent.
NOTE:  Many calendar enhancements were added to Outlook 2007 service packs. For this reason, our very first recommendation is that you make sure to use Outlook 2007 Service Pack 3 (SP3) or later. The sections below assume that you are using Outlook 2007 SP3, Outlook 2010, Outlook 2013, or Outlook 2016.


Forwarding meeting requests

If you’re using Outlook 2007, you should not forward meeting requests. This can result in lost or mismatched meetings. Instead, ask the meeting organizer to add the attendee to the original meeting request.
If you are using Outlook 2010 or newer and you’re a meeting attendee, you can forward a meeting to another person who is using Outlook 2010 or newer with the Meeting Forward Notification feature. When you use Outlook 2010 or newer to forward a meeting to someone who was not originally invited to the meeting, Outlook sends a meeting forward notification to the meeting organizer. When the organizer receives the meeting notification, the new attendee is added to the organizer’s meeting. If existing attendees need to know that an additional attendee was added to the meeting, then the organizer must open the meeting and send a meeting update to all of the attendees.
NOTE: If you want to let someone know about a meeting, but not invite them, simply drag the meeting request from your calendar to the Mailicon on the lower left side of Outlook. This opens an email with information about the meeting that you can send out. Note that this email doesn't add the recipient(s) to the meeting, and it only contains meeting information such as date, time, subject, and agenda.

For Microsoft Exchange users

Microsoft Exchange Server 2007 also introduced Meeting Forward Notifications as part of the Calendar Attendant feature. If you use Outlook to connect to a mailbox on an Exchange Server organization, meeting forward notification behavior may be subject to Exchange settings, if configured by the Exchange Administrator. For example, the Exchange Administrator can prevent meeting forward notification from being sent to remote domains.
We generally recommend that an attendee not forward a meeting if they are not in the same Exchange organization as the organizer, unless all of the following conditions are true:
  • The attendee is using Microsoft Outlook 2010 or newer.
  • The attendee’s Exchange Administrator allows meeting forward notifications to be sent to remote domains.
  • The organizer is using a Microsoft Outlook client.
In the case of an attendee who uses a non-Exchange mail system, we generally recommend not forwarding a meeting, unless all of the following conditions are true:
  • The attendee is using Microsoft Outlook 2010 or newer.
  • The organizer is using a Microsoft Outlook client.
If for any reason the organizer does not receive the meeting forward notification, the meeting attendees are not added to the organizer’s meeting. If the organizer subsequently changes the meeting and sends out an update, the update is only sent to the original invitees. The attendees who earlier received the forwarded copy of the meeting will not receive the update.
If the above limitations prevent you from successfully and consistently forwarding meeting invitations, it is best to simply ask the meeting organizer to add the desired attendees. It is important to ask the meeting organizer to add the desired attendees if you are not certain that both your and the desired attendees’ environments meet the above conditions.
NOTE:  Outlook Delegates do not receive Meeting Forward Notifications.


Process all meeting requests and cancellations

Although you can delete a meeting request directly from your Inbox, you should properly process the meeting request by either accepting or declining it. Always use the Remove from Calendar command to process meeting cancellations from your Inbox. Avoid processing meetings directly from the Calendar module.


Working with recurring meetings

Set end dates and limit the number of occurrences

Outlook makes it easy to schedule a meeting that has multiple regular occurrences. We recommend that you always set an end date and limit the recurring series to a specific number of occurrences. Most likely, recurring meetings will require modifications at some point. For example, attendees will be added to or removed from a single occurrence, or the meeting location or time will change due to vacation dates or unforeseen circumstances. Outlook saves each of these unique changes as a meeting exception. Meetings with a very large number of exceptions result in a meeting series that is difficult to manage. Additionally, it can introduce unexpected behavior. You can always create a new meeting series when the current one ends. When thinking about the number of occurrences, consider the frequency. In the period of a year, a twice weekly meeting will have about 90 more occurrences than a monthly meeting during that same period.

End a recurring meeting before the original end date

Although you can cancel a recurring meeting, a better option is to change the end date for the series. This allows you and the attendees to keep a record of the meetings that occurred in the past. If you cancel the recurring meeting altogether, that history is lost. The best option is to set a new end date and then send the update to all attendees. This ends the meeting series early, while keeping a record of previous meetings.
NOTE:  If you end the meeting series early, exceptions associated with the recurring meeting are lost. To learn more about exceptions, see “Set end dates and limit the number of occurrences” above.
For more information about cancelling all future meetings in a series, see: Cancel all future meetings in a series

Change the organizer

Outlook does not provide a way to change a meeting organizer. To change the meeting organizer of a recurring meeting, end the recurring meeting. To do this, set an earlier end date and send the update to all attendees. After you complete this step, the new organizer should create a new recurring meeting.
For more information about setting an earlier end date, see Cancel a meeting.

Avoid using a recurring meeting to share attachments

Attachments add to the complexity of recurring meeting exceptions. Each exception contains its own copy of the attachments. As exceptions are added to recurring meetings, new copies of the attachments are created. If you make changes to one set of attachments, these changes do not propagate to the other exceptions. If you require that all attendees have the most recent copy of changes for any given meeting, share the documents via a sharing service, such as OneDrive. Enterprise users can take advantage of SharePoint or other shared file server on the network.


Avoid copying meetings

By design, Outlook removes any links between a copied meeting and the original meeting. This helps prevent inconsistencies. Newer versions of Outlook add the text string "Copy:" to the subject. This makes it easy to identify meeting copies.
Actions related to copied meetings yield unexpected results, so we recommend avoiding copying meetings. This applies to both meetings copied from another user's calendar, as well as those copied from another calendar folder that you own.
For more information about how to move meetings that you organized to another calendar folder, see:


Maintain devices that connect to your calendar

Make sure that any device that connects to your Calendar has all of the latest updates installed. Some devices use Exchange ActiveSync to synchronize the Calendar and other folders. These devices include Windows Phone, Windows RT, Apple iOS, and Android devices. Research In Motion (RIM) BlackBerry devices and others can also synchronize with the Calendar.


Maintain add-ins that integrate with Outlook

Most, if not all, Outlook add-ins access Outlook data. An add-in may change an Outlook item that you are editing at the same time, whether in Outlook or on another device. This can introduce conflicts. To minimize the likelihood, make sure to install the latest updates for any add-ins or programs that integrate with Outlook. Uninstall or disable any of these programs and add-ins that you do not use or that do not need to integrate with Outlook.
NOTE:  In some cases, multiple Outlook clients and devices may modify items at the same time, which can introduce conflicts. To minimize the likelihood, do not process the same item on two or more clients or devices within a relatively short period of time.


Additional recommendations for Microsoft Exchange users

Working in a manager/delegate scenario

If your organization allows it, configure Outlook to connect to your Exchange mailbox using Cached Exchange Mode. This provides the best performance.

Limit the number of delegates

Outlook does not limit the number of delegates that you can add. However, we recommend that you only grant Editorpermissions to one (1) delegate. This allows you to track when and how a meeting was processed. Considering the fact that a delegate can use multiple devices to access your data, having many delegates with Editor permissions makes it very difficult to determine why meetings are missing or out of date.
Even if you only grant Editor permissions to one delegate, avoid adding a large number of delegates with Reviewer orContributor permissions. This is because adding large numbers of delegates may exhaust other resources. For example, the size limit for rule data may be reached. When you add a delegate, various changes take place:
  • Outlook applies permissions to relevant folders.
  • The PublicDelegates Active Directory attribute is updated to add "Send on Behalf of" permissions to the delegate.
  • Outlook adds the delegate to a forward rule on the manager's mailbox. This forwards meeting requests to the delegate.
  • Outlook saves additional delegate information in the manager's mailbox.
Each of these component areas may have different limits. Nearing these limits can affect performance and stability.
NOTES:  During development and testing of the product, Microsoft used a maximum of four (4) delegates. Additionally, the delegates only used Outlook. Devices were not included in the testing.
If the delegate with Editor permissions must be replaced either temporarily or indefinitely, change the permissions from Editorto Reviewer or none. Then, grant Editor permissions to the new or backup delegate.
Cancel one meeting in a recurring series

It’s possible to delete one meeting within a recurring series without deleting the entire series. Attendees will be notified that the particular meeting is cancelled, and the meeting will be removed from everyone’s calendar.
  1. On the navigation bar, click Calendar.
  2. Click the meeting you want to cancel, but don’t open it.
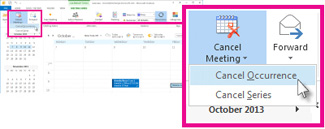
  3. Click Cancel Meeting > Cancel Occurrence.
    Cancel Occurence command on the ribbon
  4. Type a message to let the attendees know why the meeting is cancelled. It’s not necessary, but it helps to avoid confusion.
  5. Click Send Cancellation.
    Send Cancellation button in a meeting window
The meeting, including any meeting agendas, notes, and attachments, is deleted.
Only the meeting organizer—the person who sends a meeting request—can send a meeting update or a cancellation.

Change the appearance of your calendar


Outlook lets you change your calendar view to suit your own situation and working style. For example, you can quickly switch between day, week, or month views, or change your work week start day and time. You can also change your Outlook calendar’s font size and style, or choose a different background color.

Change the calendar time period

To quickly switch between day, week, or month views:
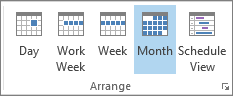
  • On the Calendar Home menu, in the Arrange group, select the view you want.
    Arrange group on the Home tab: day, week, work week, month, and schedule
    TIP: If you switch to another folder or close Outlook, your current Calendar view is saved automatically.
To change work hours, work days, or your calendar start day:
  1. Go to File > Options > Calendar.
  2. Under Work Time, do any of the following:
    • To set your work days, select the check boxes next to the days of the week that you want.
    • To set the first day of the week, in the First day of week box, select the day that you want.
    • To set the first week of the year, in the First week of year box, select the option that you want.
    • To set the beginning and end of your work day, enter times in the Start time box and the End time box.

Change the calendar color or font

To change the background color of the calendar you’re viewing:
  1. On the View tab, click Color.
  2. Select the color that you want.
IMPORTANT: Changing the color in the Calendar does not affect how your schedule is displayed in the To-Do Bar.
To change the default background color for all calendars:
  1. Go to File > Options > Calendar.
  2. Under Display Options, select Default calendar color, select the color that you want, and then select the Use this color on all calendars check box.
To change the calendar font:
  1. On the View tab, in the Current View group, select View Settings, and then select Other Settings.
  2. Use the buttons to choose the fonts and sizes that you want to use.