Monday, August 29, 2016

Create an Outlook Data File (.pst) to save your information

When you run Outlook for the first time, the necessary data files are created automatically.
Sometimes additional data files are needed. For example, older messages and items that you don’t use regularly can be archived to an Outlook Data File (.pst). Or, if your online mailbox is near your storage quota, you could move some items at an Outlook Data File (.pst).
  1. Click Home.
  2. In the New group, click New Items, point to More Items, and then click Outlook Data File.
  3. In the Create or Open Outlook Data File dialog box, in the File name box, type the name as you want it to appear in the Outlook folder pane, and then click OK.
  4. By default, data files are not password-protected. To add a password to your data file, under Password, type that password that you want to use in the Password and Verify Password text boxes.
    If you set a password, you must enter it every time that the data file is opened — for example, when Outlook starts or when you open the data file in Outlook.
    IMPORTANT:  Microsoft, your Internet service provider (ISP), or your email administrator don’t have access to your password, nor can they assist you with recovering the contents of the Outlook Data File (.pst) if you forget the password.
If you access your email account from multiple computers or devices, it’s important to know that when messages are moved to an Outlook Data File (.pst) they are available only on the computer where the file is saved.

About Outlook Data Files (.pst and .ost)

Outlook Data Files (.pst) are saved on your computer in the Documents\Outlook Files folder.
An Outlook Data File (.pst) is used for POP3 email accounts. Additionally, when you want to create archives or backup files from any of your accounts in Outlook, Outlook Data Files (.pst) are used.
Some accounts use an offline Outlook Data File (.ost). This is a synchronized copy of the messages saved on a server and that can be accessed from multiple devices and applications such as Outlook. These accounts include IMAP, Microsoft Exchange Server, and Outlook.com accounts.
Offline Outlook Data Files are saved in the drive:\Users\user\AppData\Local\Microsoft\Outlook folder. It isn’t necessary to back up an offline Outlook Data File (.ost) as it is a copy of the information on the server. If you set up the account again or on another computer or device, a synchronized copy of your messages are downloaded from the server.

Archive older items manually in Outlook for Windows

Your Outlook mailbox is only so big, and it’s a good bet that you won’t stop getting email anytime soon. To keep it from filling up, you can move old items you want to keep to an archive, a separate Outlook Data File (.pst) that you can open from Outlook any time you need it.
By default, Outlook uses AutoArchive to archive items at a regular interval. To learn more, see Archive older items automatically.
You can also archive items manually whenever you want. That way, you can control which items to archive, where to store them, and how old an item needs to be before it can be archived.
  1. Do one of the following:
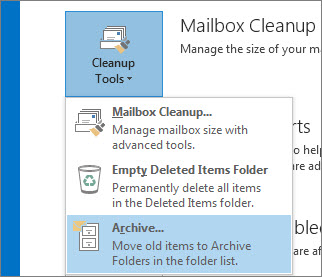
    • In Outlook 2013: Click File > Info > Cleanup Tools > Archive.

      Archive
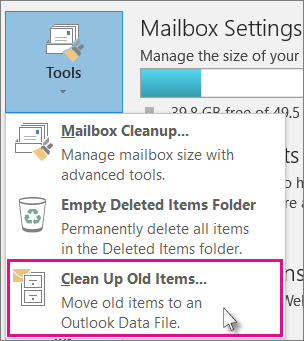
    • In Outlook 2016: Click File > Info > Tools > Clean up old items
      Clean up old items
    TIP: Archive and AutoArchive might not be available if your mail profile connects to an Exchange Server. It's also possible that your organization has a mail retention policy that overrides AutoArchive. Check with your system administrator for more information.
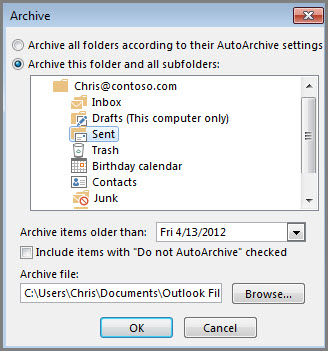
  2. Click the Archive this folder and all subfolders option, and choose the folder you want to archive.
  3. Under Archive items older than, enter a date.
    Archive dialog box
  4. You can create multiple .pst files if you want to archive some folders using different settings. For example, you may want to keep items in your Sent folder longer than items in your Inbox folder.
  5. Check the Include items with “Do not AutoArchive” checked box to archive individual items that are excluded from automatic archiving. This option doesn't remove that exclusion from these items, but instead ignores the Do not AutoArchive setting for this archive only.
  6. Click OK.

Turn off AutoArchive

To archive only when you want, turn off AutoArchive.
  1. Click File > Options > Advanced.
  2. Under AutoArchive, click AutoArchive Settings.
  3. Uncheck the Run AutoArchive every n days box.

Friday, August 26, 2016

Export contacts from Outlook


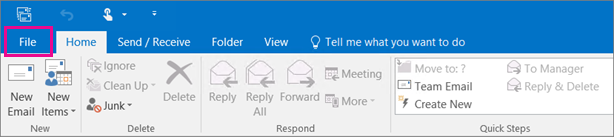
Step 1: Make sure you're using a desktop version of Outlook: 2007, 2010, 2013, or 2016. To verify you're using one of these apps, look at the picture below:
This is what the ribbon looks like in Outlook 2016.
Now look at Outlook on your computer:
  • If your Outlook ribbon has a File option in the top left corner, then you're using a desktop version of Outlook and you're in the right place! See one of the procedures below to export your contacts.
When you export your contacts from Outlook, a copy of your contacts is saved to a file. You can then use this file to import your contacts to another application.
Choose from the following list of export instructions. 

Add people to a contact group

Use a contact group (formerly called a “distribution list”) to send an email to multiple people—a project team, a committee, or even just a group of friends—without having to add each name each time you want to write them. To add people to your contact group, do the following:
  1. On the Navigation bar, click People to view your contacts.
    Click People
  2. Under My Contacts, click Contacts.
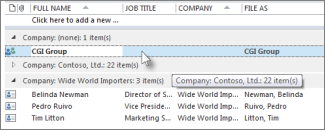
  3. Double-click the contact group that you want to add members to.
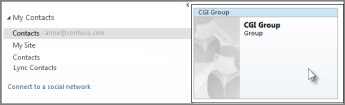
    Double-click the contact group
  4. Click Add Members, and then choose the list that you want to add a contact from. For this example, choose From Outlook Contacts.
  5. In the Search box, type the name.
  6. Double-click the name to add it to the Members box, and then click OK.
  7. Click Contact Group > Save and Close.

Change what appears on the Navigation Bar

There’s no need to keep clutter around, so if you don’t use an Outlook view, such as Tasks, you can remove it or any of the views from the Navigation Bar. You can also change the order of the Outlook views on the navigation bar.
Outlook 2013 Navigation Bar
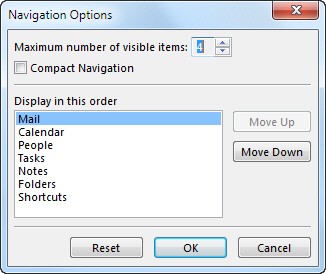
  1. On the Navigation Bar, click Navigation Options button on the Navigation Bar .
  2. Click Navigation Options.
    • To change how many views appear, change the number for Maximum number of visible items.
    • To change the view order, click a view, and then click Move Up or Move Down.
      Navigation Options dialog box
You can also drag the visible view names on the Navigation Bar to rearrange the order.
NOTE:  In Outlook 2013 and Outlook 2016, you can open Journal by pressing Ctrl+8. It never appears on the Navigation Bar.

Compact view

To maximize the vertical height of the Outlook window, you can use Compact Navigation. This removes the Navigation Bar and lists the views at the bottom of the folder pane.
  1. On the Navigation Bar, click Navigation Options button on the Navigation Bar .
  2. Click Navigation Options.
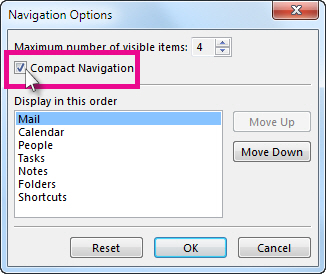
  3. Check the Compact Navigation box.
Compact Navigation command in the Navigation Options dialog box

Create a contact group from a list of contacts in Excel

If you have a lot of business or personal contacts that you keep in an Excel spreadsheet, you can import them straight into Outlook.
Then you can create a contact group (formerly called a “distribution list”) using the imported contact information. With a contact group, you can send emails and meeting invitations to people without having to add each name every time.
Unfortunately, Outlook can’t automatically create a contact group from a list of contacts in Excel. But, you can do it by following these four steps:
  1. Get your contact data ready to be imported.
  2. Import the information.
  3. Map the Excel spreadsheet columns to the appropriate Outlook fields.
  4. Create your contact group.
Let’s get started!

Step 1: Save your contact information from Excel in a file that Outlook can import

Outlook can’t import workbooks with multiple sheets, but it can import comma-separated value (.csv) files. Here’s how to save your workbook as a .csv file:
  1. In your workbook, click the worksheet with the contact information you want to import.
  2. Click File > Save As.
  3. Choose where to save your file.
  4. In the Save as type box, choose CSV (MS-DOS) (*.csv), give it a file name, and click Save.
  5. If Excel tells you “The selected file type does not contain workbooks that contain multiple sheets,” click OK. The message refers to a limitation of the CSV file; nothing will happen to your original workbook (the .xlsx file).
  6. When Excel tells you “Some features in your workbook might be lost”, click Yes to save the current worksheet as a CSV file. The original workbook (the .xlsx file) closes, but no changes are made to it.
  7.  Close the CSV file.
You're done with Excel. Now, you can start the import process in Outlook.

Step 2: Start the import

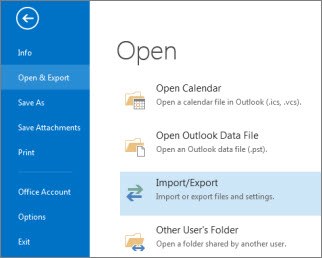
  1. In Outlook, click File > Open & Export > Import/Export.
    Import/export
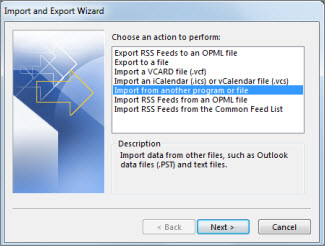
    This starts the Import and Export Wizard.
  2. Choose Import from another program or file and click Next.
    Import and Export Wizard
  3. Choose Comma Separated Values and click Next.
  4. Click Browse and locate the saved CSV file.
  5. Under Options, choose whether to replace duplicates (existing contacts), create duplicate contacts, or not import duplicates. Here are a few things to consider:
    • Replacing duplicates deletes existing contacts, if Outlook finds a match for the contact's name (or some other field, as explained in the section about mapping, below). If you already have information on some of the same contacts in Outlook, choose to create duplicates instead.
    • Creating duplicates is the safer option. You can clean up duplicates later.
    • If you're confident the information for existing contacts in Outlook is the same as the contacts in your import file, you can choose not to import duplicates. Outlook will import only new contacts.
  6. Click Next and choose where you want to store your new, imported contacts. Contacts should be selected by default. If you want a different folder, scroll to find the folder you want to use.
  7. Click Next.
  8. Make sure the check box next to Import “MyContacts.csv” (assuming that’s your file name) is selected.
  9. Don't click Finish yet, because you need to "map" some of the columns in your CSV file to the contact fields in Outlook.

Step 3: Map your CSV file columns to Outlook contact fields

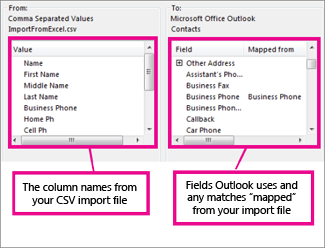
  1. Click the Map Custom Fields button. The Map Custom Fields box appears.
    • Under From, a box shows the column names from your CSV import file.
    • Under To, you see the standard fields that Outlook uses for contacts. If one matches a column in the CSV file, you'll see your column under Mapped from.
      Map Custom Fields dialog box
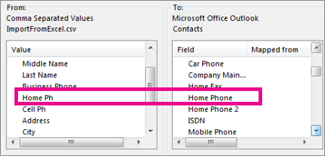
  2. You'll probably need to do some manual mapping. For example, in the following example, in your import file the contact's home phone number is in a column named Home Ph. This doesn’t have an exact match in Outlook. Instead, Outlook uses the field Home Phone.
    Map fields in the import file to fields in Outlook
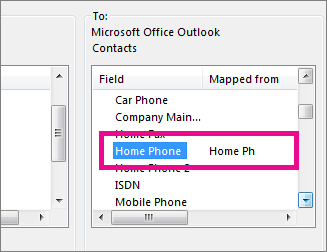
  3. Drag Home Ph from the pane on the left and drop it on Home Phone in the right pane.
    Home Ph now appears in the Mapped from column.
    Successfully mapped fields
  4. One at a time, drag the rest of the values from the left pane to the appropriate Outlook fields in the right pane. For example, you might drag Address to either Home Street or Business Street, depending on the type of address for your contacts.
  5. Click OK and Finish.
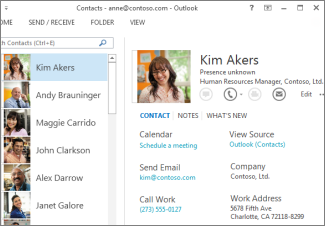
    Your contacts are now successfully imported into Outlook.
    Contacts
Now that you’ve got your contacts into Outlook, you only have one more step – creating the contact group.

Step 4: Create your contact group

  1. Click People.
    Click People
  2. Under My Contacts, pick where you want to add the contact group. For this example, click Contacts.
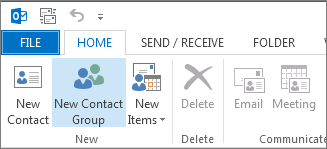
  3. Click Home > New Contact Group.
    On the Home tab, click New Contact Group.
  4. On the Contact Group tab, in the Name box, type a name for the group.
  5. Click Add Members > From Outlook Contacts.
  6. Hold down CTRL, click the contacts you imported, and then click Members to add them to the contact group.
  7. Click OK.
  8. Click Save and Close.
To learn how to use your new contact group, see Send an email message to a contact group.

Remove names from a contact group

Getting email addressed to a group you’re not part of anymore can be annoying. To make sure you don’t do that yourself, you can remove names from a contact group (formerly called a “distribution list”) like this:
  1. On the Navigation bar, click People to view your contacts.
    People
  2. Double-click the contact group to open it.
    Double-click the contact group
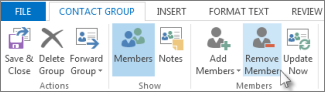
  3. Select the names you want to remove from the group, and then on the Contact Group tab, click Remove Member.
    Remove member
  4. Click Save & Close.