If you have a lot of business or personal contacts that you keep in an Excel spreadsheet, you can import them straight into Outlook.
Then you can create a contact group (formerly called a “distribution list”) using the imported contact information. With a contact group, you can send emails and meeting invitations to people without having to add each name every time.
Unfortunately, Outlook can’t automatically create a contact group from a list of contacts in Excel. But, you can do it by following these four steps:
- Get your contact data ready to be imported.
- Import the information.
- Map the Excel spreadsheet columns to the appropriate Outlook fields.
- Create your contact group.
Let’s get started!
Step 1: Save your contact information from Excel in a file that Outlook can import
Outlook can’t import workbooks with multiple sheets, but it can import comma-separated value (.csv) files. Here’s how to save your workbook as a .csv file:
- In your workbook, click the worksheet with the contact information you want to import.
- Click File > Save As.
- Choose where to save your file.
- In the Save as type box, choose CSV (MS-DOS) (*.csv), give it a file name, and click Save.
- If Excel tells you “The selected file type does not contain workbooks that contain multiple sheets,” click OK. The message refers to a limitation of the CSV file; nothing will happen to your original workbook (the .xlsx file).
- When Excel tells you “Some features in your workbook might be lost”, click Yes to save the current worksheet as a CSV file. The original workbook (the .xlsx file) closes, but no changes are made to it.
- Close the CSV file.
You're done with Excel. Now, you can start the import process in Outlook.
Step 2: Start the import
- In Outlook, click File > Open & Export > Import/Export.
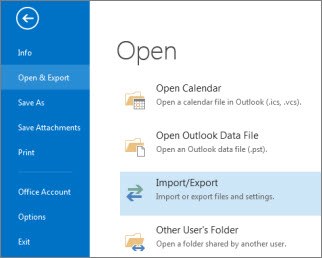 This starts the Import and Export Wizard.
 - Choose Import from another program or file and click Next.
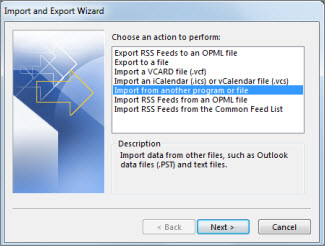
- Choose Comma Separated Values and click Next.
- Click Browse and locate the saved CSV file.
- Under Options, choose whether to replace duplicates (existing contacts), create duplicate contacts, or not import duplicates. Here are a few things to consider:
- Replacing duplicates deletes existing contacts, if Outlook finds a match for the contact's name (or some other field, as explained in the section about mapping, below). If you already have information on some of the same contacts in Outlook, choose to create duplicates instead.
- Creating duplicates is the safer option. You can clean up duplicates later.
- If you're confident the information for existing contacts in Outlook is the same as the contacts in your import file, you can choose not to import duplicates. Outlook will import only new contacts.
- Click Next and choose where you want to store your new, imported contacts. Contacts should be selected by default. If you want a different folder, scroll to find the folder you want to use.
- Click Next.
- Make sure the check box next to Import “MyContacts.csv” (assuming that’s your file name) is selected.
- Don't click Finish yet, because you need to "map" some of the columns in your CSV file to the contact fields in Outlook.
Step 3: Map your CSV file columns to Outlook contact fields
- Click the Map Custom Fields button. The Map Custom Fields box appears.
- Under From, a box shows the column names from your CSV import file.
- Under To, you see the standard fields that Outlook uses for contacts. If one matches a column in the CSV file, you'll see your column under Mapped from.
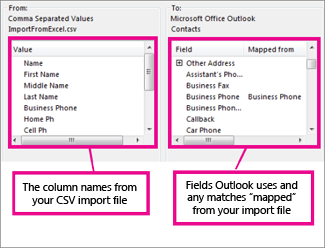
- You'll probably need to do some manual mapping. For example, in the following example, in your import file the contact's home phone number is in a column named Home Ph. This doesn’t have an exact match in Outlook. Instead, Outlook uses the field Home Phone.
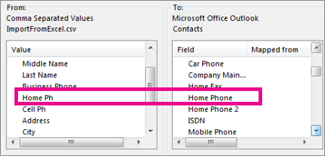
- Drag Home Ph from the pane on the left and drop it on Home Phone in the right pane.Home Ph now appears in the Mapped from column.
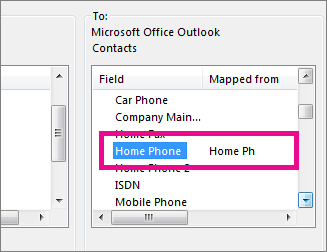
- One at a time, drag the rest of the values from the left pane to the appropriate Outlook fields in the right pane. For example, you might drag Address to either Home Street or Business Street, depending on the type of address for your contacts.
- Click OK and Finish.Your contacts are now successfully imported into Outlook.
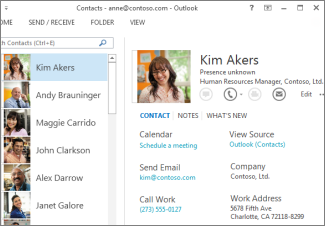
Now that you’ve got your contacts into Outlook, you only have one more step – creating the contact group.
Step 4: Create your contact group
- Click People.

- Under My Contacts, pick where you want to add the contact group. For this example, click Contacts.
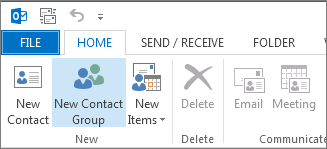
- Click Home > New Contact Group.
- On the Contact Group tab, in the Name box, type a name for the group.
- Click Add Members > From Outlook Contacts.
- Hold down CTRL, click the contacts you imported, and then click Members to add them to the contact group.
- Click OK.
- Click Save and Close.
To learn how to use your new contact group, see Send an email message to a contact group.
No comments:
Post a Comment