When a colleague at another company wants to schedule a meeting with you and they can’t see your Outlook calendar, you can send a snapshot of your calendar or, better yet, an invitation to subscribe to your calendar in an email message.
If you have an Office 365 or other Exchange-based account, you can also send a sharing invitation to other users so they can view your calendar in their own Calendar list.
Share your calendar in an email
- Click Calendar.

- Click Home > E-mail Calendar.

- In the Calendar and Date Range boxes, pick the calendar and time period you want to share. For example, choose Today only or for the Next 7 days.
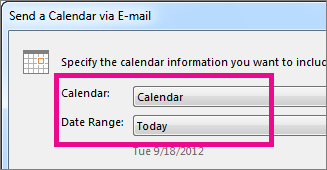
- Set any other options you want, and then click OK.
- In the new email that opens, add who you want the message to go to in the To field, add a message if you want, and click Send.
The person you sent your calendar to will see a snapshot of your calendar in the message.
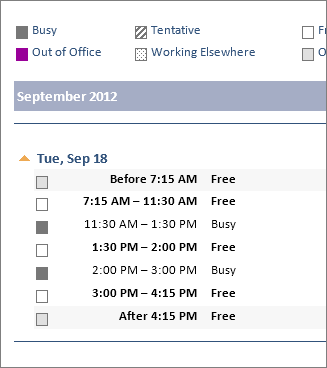
The message also includes an attached iCalendar (.ics) file that they can open in Outlook or another calendar program. When the recipient clicks the iCalendar file, Outlook displays the file as a new calendar that they can view side-by-side with their calendar. They can drag appointments or meetings between the two calendars, and find a time that works for both of you.
Share your Office 365 or other Exchange-based calendar with people inside or outside your organization
If you have an Office 365 or other Microsoft Exchange-based email account, and you want to share your calendar with someone who is inside or outside your organization, you can give them permissions to view your calendar.
Share your calendar with people inside your organization
- Click Calendar.

- Click Home > Share Calendar.

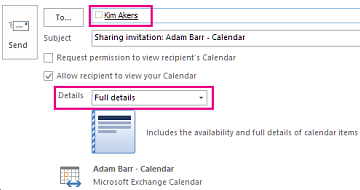
- In the email that opens, type the name of the person in your organization that you want to share your calendar with in the To box. In Details, specify the level of details that you want to share with the person in your organization, and then click Send.
- The person in your organization receives the sharing invitation in email, and then clicks Open this calendar.
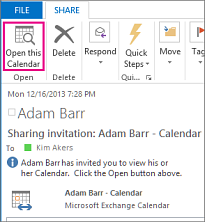
The shared calendar displays in the person’s Calendar list.
Share your calendar with people outside your organization
- Click Calendar.

- Click Home > Share Calendar.

- In the email that opens, type the email address for the person outside of your organization that you want to share your calendar with in the To box. In Details, specify the level of details that you want to share with the person outside of your organization, and then click Send.
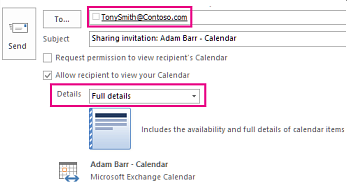 If the following error displays when you try to send your sharing invitation, you have tried to share more details than is supported by the settings in your organization. If this occurs, under Details, choose to share a different level of details. Only an admin in your organization can change the sharing policy settings for your organization. For more information, see the end of this section.
- The person in your organization receives the sharing invitation in email, and then clicks Open this calendar.
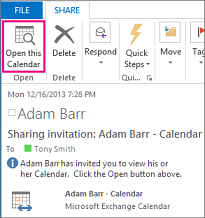
- The shared calendar displays in the person’s Calendar list.
If you receive an error when you try to share more details that are supported by the sharing policy settings in your organization, contact the person that manages your email account.
Change permissions after you have shared your calendar with other people
You can change calendar sharing permissions.
- Click Calendar.

- Click Home > Calendar Permissions.

- On the Permissions tab, make any changes to the calendar sharing permissions.
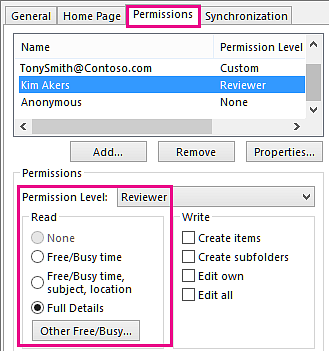
- Click OK.
Share a calendar by publishing it to a web page
If you have access to a web server that supports the World Wide Web Distributed Authoring and Versioning (WebDAV) protocol, you can publish your calendar there.
NOTE: Not sure if your server supports WebDAV? Your server administrator or internet service provider (ISP) should be able to tell you.
- Click Calendar.

- Click Home > Publish Online > Publish to WebDAV Server.NOTE: If your email account uses Exchange, you will see Publish This Calendar, instead of the option to publish to a WebDAV server. This lets you publish your calendar directly to an Exchange Server. In the window that opens, select the publishing options you want, and click Start Publishing.
- In the Location box, enter the location of the WebDAV server, select any other publishing options you want, and then click OK.
No comments:
Post a Comment