As projects come and go, so too will your group members. Undoubtedly, you'll need to add and remove members over the life of the group; you might even need to add or remove group owners.Any member of a public group can add others to the group, but only the group owner can remove them. By default, the group owner is the person who created the group but others can be assigned this role as well.
Add Members to a Group- Open Outlook on the web.
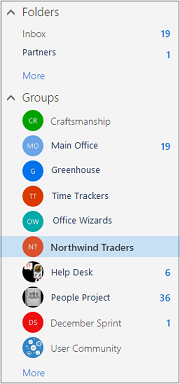
- In the navigation pane, under Groups, select your group.

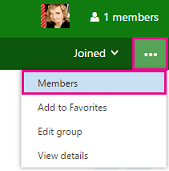
- In the group header, select
 > Members.
- Choose the Add members button.

- Enter the name of a person in your organization who you want to add. The member must have a user mailbox within your Office 365 tenant. As you type, suggestions will be displayed. Select the appropriate person. To add multiple members, start typing the next name after each selection.

- Choose Save.
Remove a Member from a GroupYou must be a group owner to remove members. - Under the group header, click All to see all of the group members.

- Hover over the name of the member you want to remove, and then click
 > Remove from group.
View Group OwnersUnder the group header, select Owners to see all of the group owners.
Promote a Member to OwnerYou have to be a group owner to promote one of your group members.- Under the group header, select All.

- Hover over the name of the member you want to promote and choose
 >Make owner.
Demote an Owner to MemberWhen demoting an owner to member status, keep in mind that the group must have at least one owner. Only group owners can demote.- Under the group header, select Owners.

- Hover over the name of the member you want to promote and select
 > Remove owner status.
As projects come and go, so too will your group members. Undoubtedly, you'll need to add and remove members over the life of the group; you might even need to add or remove group owners.
Any member of a public group can add others to the group, but only the group owner can remove them. By default, the group owner is the person who created the group but others can be assigned this role as well.
Add Members to a Group
- Open Outlook on the web.
- In the navigation pane, under Groups, select your group.

- In the group header, select
 > Members.
- Choose the Add members button.

- Enter the name of a person in your organization who you want to add. The member must have a user mailbox within your Office 365 tenant. As you type, suggestions will be displayed. Select the appropriate person. To add multiple members, start typing the next name after each selection.

- Choose Save.
Remove a Member from a Group
You must be a group owner to remove members.
- Under the group header, click All to see all of the group members.

- Hover over the name of the member you want to remove, and then click
 > Remove from group.
View Group Owners
Under the group header, select Owners to see all of the group owners.

Promote a Member to Owner
You have to be a group owner to promote one of your group members.
- Under the group header, select All.

- Hover over the name of the member you want to promote and choose
 >Make owner.
Demote an Owner to Member
When demoting an owner to member status, keep in mind that the group must have at least one owner. Only group owners can demote.
- Under the group header, select Owners.

- Hover over the name of the member you want to promote and select
 > Remove owner status.
No comments:
Post a Comment