Description
The Microsoft Excel COUNTIFS function counts the number of cells in a range, that meets a single or multiple criteria.
Syntax
The syntax for the COUNTIFS function in Microsoft Excel is:
COUNTIFS( criteria_range1, criteria1, [criteria_range2, criteria2, ... criteria_range_n, criteria_n] )
Parameters or Arguments
- criteria_range1
- The range of cells that you want to apply criteria1 against.
- criteria1
- The criteria used to determine which cells to count. criteria1 is applied againstcriteria_range1.
- criteria_range2, ... criteria_range_n
- Optional. It is the range of cells that you want to apply criteria2, ... criteria_nagainst. There can be up to 127 ranges.
- criteria2, ... criteria_n
- Optional. It is used to determine which cells to count. criteria2 is applied againstcriteria_range2, criteria3 is applied against criteria_range3, and so on. There can be up to 127 criteria.
Applies To
- Excel 2016, Excel 2013, Excel 2011 for Mac, Excel 2010, Excel 2007
Type of Function
- Worksheet function (WS)
Example (as Worksheet Function)
Let's look at some Excel COUNTIFS function examples and explore how to use the COUNTIFS function as a worksheet function in Microsoft Excel:

Based on the Excel spreadsheet above, the following COUNTIFS examples would return:
=COUNTIFS(A2:A9,"=2013")
Result: 4   'Applies 1 criteria

=COUNTIFS(A2:A9,"=2013",B2:B9,"=Oranges")
Result: 2   'Applies 2 criteria

=COUNTIFS(A2:A9,">=2009",B2:B9,"=Oranges", A2:A9,"<=2012")
Result: 1   'Applies 3 criteria

=COUNTIFS(A2:A9,">=2009",B2:B9,"=B*")
Result: 2   'Uses the * wildcard to match on all products that start with B

=COUNTIFS(A2:A9,">=2009",B2:B9,"=B?nanas")
Result: 2   'Uses the ? wildcard to match on a single character, ie: Bananas, Benanas, Binanas, Bonanas, and so on
Using Named Ranges
You can also use a named range in the COUNTIFS function. A named range is a descriptive name for a collection of cells or range in a worksheet. If you are unsure of how to setup a named range in your spreadsheet, read our tutorial on Adding a Named Range.
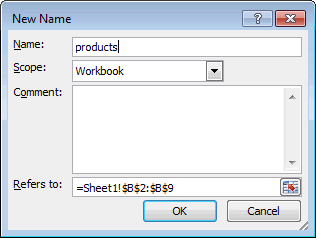
For example, we've created a named range called products that refers to the range B2:B9 in Sheet 1.
Then we've entered the following data in Excel:
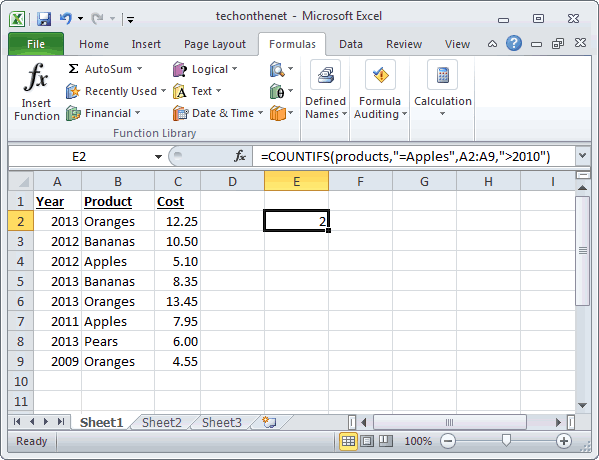
Based on the Excel spreadsheet above:
=COUNTIFS(products,"=Apples",A2:A9,">2010")
Result: 2

=COUNTIFS(products,"=Oranges",A2:A9,"<2014")
Result: 3
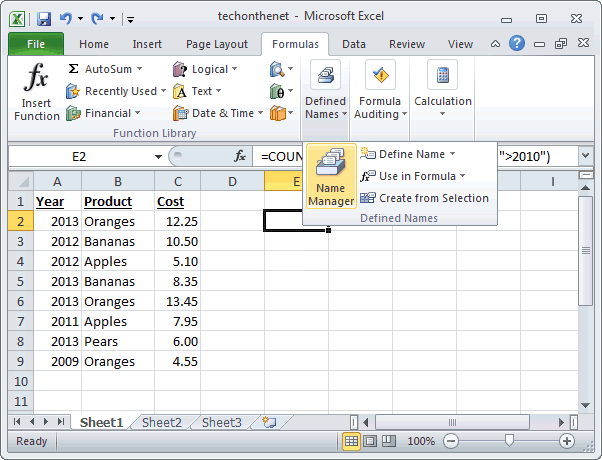
To view named ranges: Select the Formulas tab in the toolbar at the top of the screen. Then in the Defined Names group, click on the Defined Names drop-down and select Name Manager.
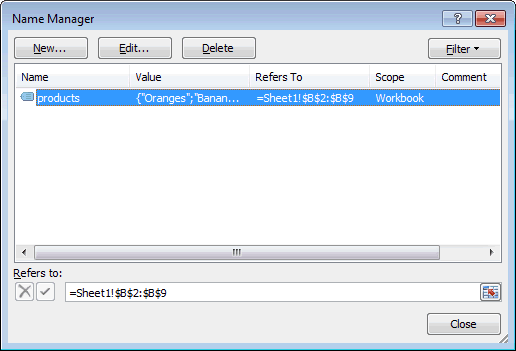
The Name Manager window should now appear.
No comments:
Post a Comment